Showing posts with label DIY. Show all posts

Thursday, January 31, 2013

Using Coconut Oil as a Hair Conditioner

Coconut Oil
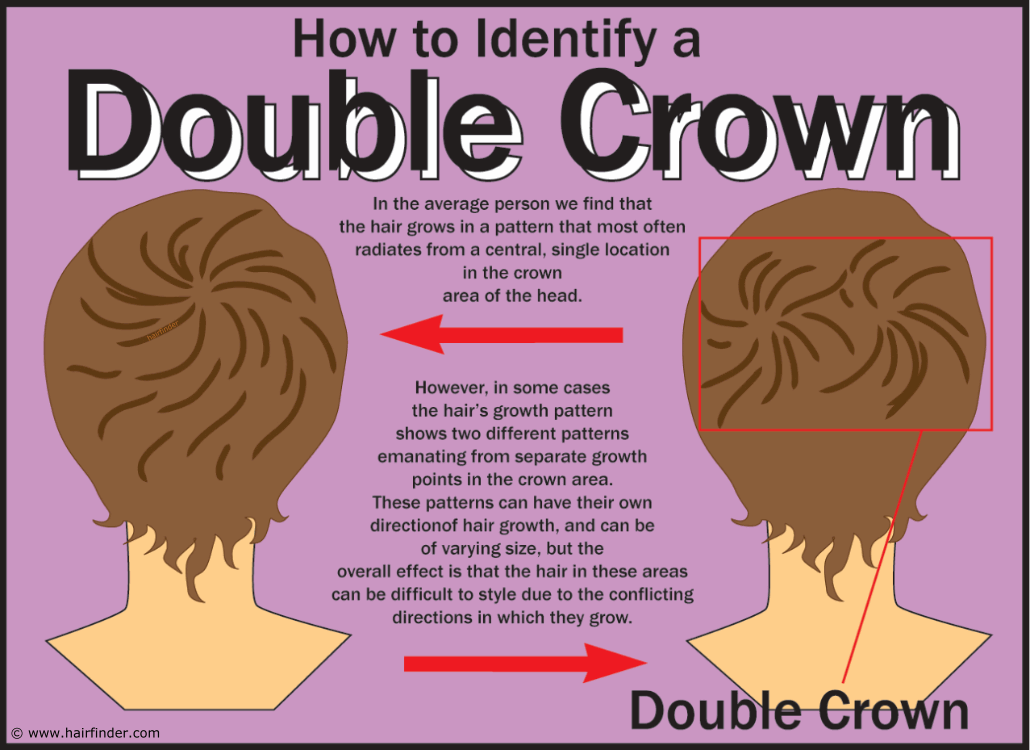
Those of you that know me know that I have tons (yes, literally tons) of hair on my head. It's long and thick and not in the beautiful Hollywood or Real Housewives of (fill in the blank) kind of way. And, as an added bonus to my double crown (go ahead click the link, I'll wait), natural wave (only in one weird spot), cowlick (who named it that anyway?), I have hair that gets really dry in the winter. So while 'wasting time' on Pinterest I came across a pin from How Does She? using coconut oil as a natural hair conditioner. Hmmm...intriguing.

Now, this wasn't the first time I had heard someone singing the praises of coconut oil. I've heard of it used for cooking, face and skin moisturizers, baby needs (diaper rash), and then here as a hair conditioner. Subconsciously I had been keeping an eye out for a good deal so that I could give it a go, for one of the methods mentioned above.  So when I strolled past an endcap at Costco and spotted a 54oz jar of it for under $20 bucks I decided to give it a whirl.

I brought it home and sat it on the kitchen counter. And it sat. And it sat. And it sat, until today. I posted this morning on our Facebook page that I was going to test a Pinterest tip so that I would be held accountable to actually do it! This afternoon I grabbed a ziplock bag and used a spoon to scoop out a handful of the coconut oil and headed upstairs to give it a go. If you've never seen coconut oil it's actually a solid that melts to an oil at body temperature.

Once upstairs I followed How Does She?'s instructions exactly.

Let's me just say that this stuff smells SO good. Like you're bathing in a giant pina colada. 


Click the picture above to pin it!

First I brushed out my hair then I put a small amount of the gunk in my hand and rubbed them together to create an oil. Then I rubbed the oil into my hair. I started at the ends and worked up to my roots covering every.single.strand. Once my hair was coated I wrapped it up, held it in place with hair clips and put on a shower cap (courtesy of some hotel). At that point I sat down and watched a cartoon with my daughter as she looked at me funny and sniffed me. After about 30 minutes I jumped in the shower and let the steam do it's job for a few minutes before washing my hair two times. I always use conditioner when I wash my hair but didn't this time as I wanted to see what it could do it on it's own.

So my review?

It works. It totally, works. I do believe that I'll repeat this each time I wash my hair for a few times and then just do it every so often. But, after just one time I can definitely tell a difference.

I will say that while you are waiting have a hand towel handy as I did notice it 'melting' a bit down my face. Not a ton but enough to wipe away. And, as an added bonus...my hands are super soft!

If you have a membership to Costco and would like to try it out it's the cheapest price I have found. If not, they do sell it on Amazon and I'm including a link for you to check it out.


Saturday, July 21, 2012

Putting together her nursery was a real HOOT!

Today has been a busy but fun day and this mamma is spent!  I figured this would be the perfect opportunity to post about Elia's nursery (why not, it's been done for a year!).  Her nursery, like most everything we do, was done mostly DIY and on a pretty tight budget.  Our big splurges were the crib and the changing table.  We chose the changing table because it could easily be used as a dresser for many years to come.


We purchased the wall decals from a shop on Etsy.  They had fantastic customer service and helped me with my multiple questions and emails.  You can check out their shop by clicking here.  The decal was easy to apply but it did take awhile as each leaf is a separate decal and the owl is a layered effect.  Ignore the fact that I did go into labor the evening we finished it!  Nothing like waiting until the last minute!


The sheets, changing pad cover, and valance were all purchased from Amazon.  The valance wasn't part of the same set but I thought the colors were a close enough match.


The leather rocker/recliner was a steal of a deal at Nebraska Furniture Mart.  Amazingly, this ended up being cheaper than the standard nursery gliders and, in my opinion, it's much more comfortable.  At some point this will probably be moved to another room.  


The mirror over the changing table was on sale at Home Goods for about $20.  It was originally silver and I did a couple quick coats of white gloss spray paint to match the rest of the furniture.  Don't be afraid to alter sale items to make them exactly what you want!  Similar mirrors in white (for some unknown reason) were closer to $100.  I just couldn't imagine spending that when I could replicate it with one can of spray paint.  Elia loves looking at herself in the mirror after a diaper change!  


I love the little birdies that watch over her as she sleeps.  We've named them Howard, Bob, and Amos--and those who know us will know why.


I'm in LOVE with her gallery wall.  The hubs made the ledges and I sanded and painted them.  They are a perfect solution for a small room and a way to get the books up off of the floor.  At this point she can only reach the bottom shelf so it has her board books and her nicer books are higher up.

I still have one whole wall that is bare and I hope to fill it with some upcoming Pinterest projects.

Do (or did) your kids rooms have a 'theme'?  Do you have any DIY projects that you're proud of in the room?  I'd love for you to leave a comment about your nursery/kid rooms!


Friday, July 6, 2012

Summa-Summa-SummaTIME! Serving it up in style!

I am so excited about today's project.  To be honest, this project took more than one day to complete because of triple digit temps, high winds, and busy schedules.  BUT, such is life.  I was on the look out for a serving cart for our deck and found a fun alternative.  So--here it is!

What's one item that can almost always be found at garage sales?  It's usually inexpensive and if  not you can drive a few blocks and probably find another one.  That's right, a changing table!   


I cleaned it up, then sanded and painted it.  I added some removable wall decals from Home Depot to the top shelf and the inside of the drawer and added a towel rack to the front.  Tip: Save some money on your towel rack and stroll right past them and head to the cabinet pulls.  I found my large cabinet handle for about a third of the price of a small towel rack!  Bonus Tip:  Buy a small cheap grill cover to protect your cart when it's not being used (I found one for $9 at Home Depot) .    

I had a piece of glass made for the top to protect the patterned decal from moisture and finished it up with some silicone caulking and then added wheels to the bottom to make it easy to move around.


This project was fun and I'm looking forward to using it for cold beverages on our hot deck this summer.  I love the way that it turned out!  What do you think?  Do you have an old changing table that could have a brand new snazzier life?


  a mom blog community!

Copyright © Team Ibrahim | Blog Design by Lilipop Designs