Showing posts with label The Pinterest Project. Show all posts

Thursday, July 26, 2012

How To Make Hard Baked Eggs

Baked? Say waaaaa? Yes. Baked.

Supposedly, this 'new' method gets the same, if not better, results as the old boiling method that we all know. I found the pin by The Burlap Bag and decided to give it a try. Her method is pretty easy which is comforting since everyone seems to have their own special instructions when boiling the perfect egg.

Preheat the oven to 350. Place your eggs in a muffin tin. I've seen people put them right on the oven rack but, in my opinion, it's easier to get them in and out of the oven if they are in something. The Burlap Bag suggests baking for 30 minutes. Although they came out pretty good, I may decrease the time a bit next time. Ovens vary so you might want to experiment and make adjustments.


After baking, pull them out with tongs and put them in a bowl of ice water for 10 minutes.


After 10 minutes they are ready to peel! Look how beautiful the yolk turned out! No dark spots!


After baking there were some weird brown spots on the shells but they came off when they were put into the water. When I peeled them there was a very small brown spot where the shell rested on the pan. It wasn't a big deal for me and wouldn't stop me from trying this again.

Yes, I could technically boil eggs faster than this BUT, this was pretty easy too. Not much to it really. I do think that this will be my new method for making 'hard boiled-like' eggs. 

Have you ever tried this?  

Wednesday, July 25, 2012

Put Down the S'bucks and Step Away From the Pastry!

It's mid-morning and breakfast is a distant memory and lunch seems years away. Does this sound familiar? How often do you skip breakfast all together? Or, are you like me who has to force myself to eat breakfast because it's my least favorite meal of the day. I'm just not a big fan of the traditional breakfast items. I'll admit, Team Ibrahim doesn't 'dig on pig' which means we don't' 'dine on swine' so our choices are often limited.

Determined to work a breakfast-type meal into my schedule I was on the lookout for something that was quick, relatively healthy, and tasty. I found this pin by Gimme Some Oven (love that blog name by the way!) for some no-bake energy bites. I loved it before I tried it because the name included the words "no bake and energy"--a mamma's dream come true!


Click on the photo above to PIN!

I have made these no less than five times since finding the pin and they are still just so dang yummy. I make a batch on the weekend and they typically last me through the week. I like to mix them up and then use my 1 inch cookie scoop to scoop them into equal portions. If you are using a scoop you don't need to let the mix chill for 30 minutes, it actually scoops easier if you don't. I line them in an airtight container with a layer of parchment paper in between. Each morning I eat two with a small glass of milk and I'm set until lunch. I did make a few changes to the recipe but feel free to use the original or make changes of your own. One is that I do not toast the coconut, I just throw it in the bowl straight from the bag--I think not toasting it helps keep them moist. The other change is that I use mini-chocolate chips. I like the small bits of chocolate rather than a big 'ole honkin' bite of chocolate. It is breakfast for goodness sakes, lets be civilized people!

TIP:  The recipe doesn't mention it but I like to grind my flax seeds right before I use them.  I use my little spice grinder that I purchased on Amazon.  Click here to find it on Amazon.  

BONUS TIP:  Grinding the flax seeds adds air and fluff and other magical things that make your flax seeds double.  In other words, if you need 1/2 cup for the recipe only grind 1/4 cup of seeds.  Cool huh?  

I do realize that if you are counting calories these are probably not the healthiest option (vs. an egg white omelet or something) but they definitely aren't the worst (vs sugary cereal or pastries). In fact, I think they are probably closer to the healthier side. I think the best thing about them is they are super tasty, almost sinful -- and they keep me satisfied until lunch! I keep them in the fridge and only allow myself to have the two for breakfast and do not snack on them throughout the day. Now, I actually look forward to breakfast!

Try them out and let me know what you think. I promise you, if you like no bake cookies--these aren't too far off!  

Sunday, July 22, 2012

A Summer Dinner You Will LOVE!

Unless of course, you hate tomatoes, fresh mozzarella, and grilled chicken.  If that's the case, I'm sorry...you can stop reading here.

I have to say that this is one of our favorite Pinterest recipes to date.  It's easy, it's delicious, and it's a fantastic way to use up those fresh garden tomatoes from your garden or the farmer's market.

Picky Palate, posted this recipe and also includes a great leftover fix for the next day.  You can check out the recipe details here.


TIP:  Do yourself a favor and make twice as much chicken as you and your family will eat for dinner and made the sandwiches the next day!  My husband, (who drives me nuts and doesn't like leftovers) actually said that the leftover sandwich was "one of the best sandwiches he's ever had."--That, my friends, is a big deal!

BONUS TIP:  Be careful not to overcook the chicken, especially the ones that will be used for the sandwiches the next day.  They shouldn't be pink, of course, but pull them off the instant they are done.  They should be juicy (but the juice should be clear) as they will cook a bit longer when you re-heat them.

I'd love to know if you tried the recipe and what you think.  Did your family love it?  

Friday, July 20, 2012

A Tisket, A Tasket, A Freakin' Genius Shower Basket!

I have been looking for a solution for this problem for years.  Our master shower lacks any sort of storage, shelves, or ledges which means everything is stored on the floor of the shower.  And, I hate it. I've never been able to find a solution that didn't take up precious real estate in our teeny little shower stall.  I love that this is an inexpensive solution that can be removed and doesn't cause any damage to the shower or tile.  Unfortunately, the pin I found links to a picture and not a blog so I'm not sure who to credit with the idea.

All you'll need is a second shower rod, shower curtain rings (Target has them for a little over a dollar), and baskets.  FYI: Target has baskets in their dollar bins RIGHT NOW!  I picked up a few for our shower and for our daughter's bathroom.  They even have them in different colors!  Here are a couple of pictures of the baskets in Elia's bathroom.


So what will we store in these fantastic little baskets?  Elia's bath toys, shampoo, conditioner, face wash, sugar scrub, toothpaste and a toothbrush (my husband is a shower toothbrusher--I've tried it and I just can't get on board with it).  Just in case you are wondering, his toothbrush and toothpaste are not on the floor, he brings them in and out with him--except for those times when he doesn't and I hear a yell from across the house to bring them to him.  Good lord, I'm happy that won't be happening anymore!

Super easy, super cheap (around $10) and I'm so excited to get the junk off the shower floor!

Friday, July 6, 2012

Summa-Summa-SummaTIME! Serving it up in style!

I am so excited about today's project.  To be honest, this project took more than one day to complete because of triple digit temps, high winds, and busy schedules.  BUT, such is life.  I was on the look out for a serving cart for our deck and found a fun alternative.  So--here it is!

What's one item that can almost always be found at garage sales?  It's usually inexpensive and if  not you can drive a few blocks and probably find another one.  That's right, a changing table!   


I cleaned it up, then sanded and painted it.  I added some removable wall decals from Home Depot to the top shelf and the inside of the drawer and added a towel rack to the front.  Tip: Save some money on your towel rack and stroll right past them and head to the cabinet pulls.  I found my large cabinet handle for about a third of the price of a small towel rack!  Bonus Tip:  Buy a small cheap grill cover to protect your cart when it's not being used (I found one for $9 at Home Depot) .    

I had a piece of glass made for the top to protect the patterned decal from moisture and finished it up with some silicone caulking and then added wheels to the bottom to make it easy to move around.


This project was fun and I'm looking forward to using it for cold beverages on our hot deck this summer.  I love the way that it turned out!  What do you think?  Do you have an old changing table that could have a brand new snazzier life?


  a mom blog community!

Thursday, July 5, 2012

Dishwashers Need Love Too

A quick search on Pinterest led me to One Good Thing by Jillee who had a post on how to clean a dishwasher.  In an attempt to take better care of our beloved appliances (you must speak very highly of these machines because if they hear you bad-mouthing them they tend to go on strike).  Granted, cleaning the dishwasher isn't as fun as crafting or DIYing but today's schedule requires a pretty quick and easy project.  Have you ever cleaned your dishwasher?  My answer is a big fat, appliance neglecting, no...that is, until today.

One Good Thing by Jillee, gives fantastic step-by-step instructions, as well as, easy tips to improve efficiency with every cycle.


Our dishwasher is clean and sparkly and good 'ole Madge is ready to get to work!  Today's project was super easy and I plan to repeat it on a regular basis.  Have you ever cleaned your dishwasher?  How often do you do it?


Wednesday, July 4, 2012

Happy 4th of July!


We're heading to my sister's house and plan to enjoy family and friends and the warm Kansas sun.  We are so thankful to be able to celebrate with the ones we love.
Have a festive 4th of July!  

Today's image was created by The Crafting Chicks.

Tuesday, July 3, 2012

What's for Dessert?

Today's Pinterest Project was inspired by Fabulous You and my husband.  Since our homemade ice cream from Friday has almost disappeared I proactively picked a project that would answer his inevitable after dinner question of "What's for dessert?".

I've never met someone that didn't love Texas Sheet Cake.  Probably because, I'm not sure I could associate with someone who didn't love it.  My Grandma can make it from memory and she always seems to have the ingredients on hand.  This cake has been a family favorite for birthdays, holidays, BBQs, and often, for no reason at all.  If you've never had Texas Sheet Cake or aren't sure if you have--it's the moist and chocolatey cake with a fudge like layer of frosting.  And yes, it has enough butter to make Paula Deen giddy.  Fabulous You adjusted the traditional sheet cake recipe into 24 cupcakes.  And who doesn't love a cupcake?


I happened to have all of the ingredients on hand except for buttermilk.  I knew there was an easy substitute but couldn't remember the ratios so I googled 'buttermilk substitute' and found it.  If you find yourself buttermilk-less too, just pour 1 tablespoon of white vinegar or lemon juice into a measuring cup and then pour milk until you reach the 1 cup line and let it sit for 5 minutes.  Once I had the buttermilk ready I mixed the cupcakes per the recipe on Fabulous You.


The cupcakes turned out pretty well and they were a perfect dessert with a cold glass of moo-juice.  I would say that just pouring the batter into a sheet pan and then pouring on the frosting is much easier than doing it 24 times.  However, the cupcakes are much better for portion control.  It's easier to control myself and eat one cupcake than the alternative..."I cut myself a tiny piece of the sheet cake then some how I ate the entire North 40."  I'm not saying that's ever happened to me...okay, it's happened.  Stop judging me!

So, whether you choose a sheet cake or cupcakes, pick one and make this recipe today.  You probably have the ingredients on hand and your family will love you for it!  

Monday, July 2, 2012

Eliminating Clutter One Day at a Time

Today's Pinterest Project is AMAZING!  I've always been a list maker, a 'one chunk at a time' kinda-gal.  To me, there is little more satisfying that knowing what needs to be done, doing it, and then  crossing it off my list with one gratifying sweep of my pen.  It helps make huge projects doable, and who doesn't love that?  

My Simpler Life, has taken the time to break down removing clutter from your home in to quick and easy tasks that you do every day.  AND, she put it in calendar form!  This is totally something I would do, but now I don't have to!  Thank you, My Simpler Life!

If you visit My Simpler Life, you'll be able to download (FREE) monthly calendars or you can download the entire year.  My plan is to start today, July 2nd, and work forward.  If I get to a day that doesn't apply to my home I'll work backwards by completing a task that was before July 2nd.

I love the idea of managing clutter this way.  I hope you find this link helpful and post a comment and let me know if you plan on eliminating clutter one day at a time! 

Sunday, July 1, 2012

Rollin' Rollin' Rollin' Rosettes!

Today's Pinterest Project was inspired by The Idea Room.  I chose it because I liked the way it looked and thought it would make inexpensive decorations for our daughters upcoming Olivia themed 1st birthday party.  It was very easy to make and budget friendly!

I already had a styrofoam ball and glue for my glue gun.  All that I had to purchase was the crepe paper which was $1.99 at Target.  Hobby Lobby did have bigger rolls for only 99 cents but they didn't have red.

The only change I made was that I didn't fold the crepe paper like The Idea Room suggested.  It went pretty fast, once I got the hang of rolling the rosettes.  I also found out that I suffered fewer glue gun burns when I put the glue directly on the ball rather than the rosette.  I'm not quite sure how I am going to use it yet.  I'm either going to attach some ribbon and hang it, or use the black stand shown in the picture.


The black stand is another project that I did years ago.  The top is a cheese board and the bottom was an ugly green candle holder.  Both items were purchased during Garnett City Wide Garage Sales--so my apologies if the 'ugly green candle holder' belonged to you.  I painted both pieces black and used Gorilla Glue to attach them.  I hot glued the ends of some red polka dot ribbon around the base (shown above) so that I could remove it after the party.


To wrap it up, this was a fun project that only cost me $1.99 (and I still have materials left!) and I'm pretty sure I'll use it at Elia's birthday party.  I worked on it throughout the day but I would think its could be done in a couple of hours (while watching TV)--it's a perfect 'multi-tasking' project!

Saturday, June 30, 2012

Star Spangled Cuteness!

I have to say, out of all my projects so far, I think this one is my favorite.  Okay, so maybe a tie with the  ice cream.  Today's Pinterest Project was inspired by the tank below.  Unfortunately, the pin that I found links to the picture and not a blog so I'm not sure who to credit with the idea.  There are several variations and you can find them by searching in Pinterest for "4th of July shirt".


I had to make a quick trip to Hobby Lobby to snag a few of the supplies that I didn't already have on hand.  I grabbed some jumbo red ric rac, red thread, a blue star button, and some blue ribbon with white polka dots.  I already had a new white t-shirt so I was ready to go!

TIP:  Saturday evenings are actually the best night to shop at the Hob Lob.  Since they are closed on Sundays they start changing the prices for the next weeks sale items on Saturday.  So, not only do you get the sale prices for the current week but also for the next week!  

To get started, I laid the ric rac in position and secured each row with a small piece of scotch tape.  I made the top two rows a bit shorter on the left hand corner as to replicate where the blue square and white stars on the flag are (or in this case the bow).  Once I had them all cut and positioned I pinned them and removed the tape.  You might not need the tape but I found it was easier to reposition and helped me avoid unnecessary pin holes.  Once all the ric rac was positioned and pinned I started sewing and attached with a basic stitch using red thread.

I made the bow by simply making loops and was careful to start with a tail and end with a tail.  Once I had the bow the way that I wanted it I stitched the middle to secure it and then added the star button.  Then I just sewed the bow to the t-shirt.  You might consider making the bow removable for laundering but I wasn't sure how to do that and so I decided I would just hand wash.

And here it is!


I apologize for not having step by step pictures.  I started pretty late and was worried I wouldn't finish and have time to post!  This is a pretty simple project and I was able to figure it out with just the finished product and I'm confident you will too!

I'm the worlds slowest when it comes to sewing so this took me a couple of hours (with a couple interruptions).  If you have more experience it could easily be a 30 minute project.  I can't wait for Elia to wear this to my sister's party on the 4th!  


UPDATE:  Elia modeling her Pinterest inspired 4th of July t-shirt!  


Friday, June 29, 2012

I Scream! You Scream!

The heat this week is almost unbearable.  I strongly believe that if I am going to be this hot I should be on a beach somewhere drinking fruity drinks and sending postcards home to family and friends bragging about the sun.  BUT, alas, I'm land-locked here in KC and trying to make the best of it.  And, by making the best of it, I mean making homemade ice cream and not going outside...ever again.

Let's back up a bit.  I have always dreamed of owning a KitchenAid mixer.  A red one.  It would be beautiful and it would stand proud on my kitchen counter.  Oh, the batches of deliciousness that would begin in that mixer.  Cookies, breads, muffins, pasta, can you just imagine the lovely carbs I could concoct?!

Well, much to my delight my wonderful husband bought me my very own Professional KitchenAid mixer (a red one--squeal!) for Christmas.  Oh, happy day!  After giving the box a hug and my husband a tight squeeze I shoved the family out of the way and slid it into the kitchen to find its new home.  Toaster?  Nah, it can go in the cabinet.  Coffee-maker?  When do we ever use that silly thing?

Then, to make my new favorite appliance even better my parents gave us the ice cream maker attachment.  A red KitchenAid Mixer AND the ice cream maker attachment??  I seriously thought I had to be dreaming and if I was...DON'T WAKE ME UP!

Since I've had my beautiful mixer I've made cookies, bread, pizza dough, and a few batches of ice cream.  I have to say, when he can hear the hum of the mixer my husband knows that good things are about to happen.  So far I've made vanilla and chocolate ice cream following the recipes in The Perfect Scoop.  This book is pretty much every ice cream recipe you can think of plus sorbets, granitas, and sweet accompaniments (think homemade ice cream add-ins).  The vanilla was fantastic--creamy and rich and would rival anything you would find in a swanky-boutique ice cream shop.  The chocolate, and forgive me for what I am about to say, was a bit too chocolaty for me.  I know, I know.  If I were to make it again I'd probably halve the amount of chocolate.

Since the recipes in the book are proven I would normally just grab the book and pick a recipe but today I'm craving something a bit different.  A bit nostalgic.  Where I'm from, homemade ice cream is still made in a tall skinny can and packed in ice and rock salt and cranked until the youngest kid passes out from exhaustion.  There's just something about ice cream made this way.  I'm not sure if it's the recipe or the method but it's almost soft serve and it has this distinct flavor that you just know it was made by someone you know.

I'm not sure of the recipe that my family uses (and I could just call and find out) BUT, this is The Pinterest Project so I searched Pinterest for a recipe that I thought may be close.  I found a pin that linked to a recipe that had great reviews and looked simple enough.  Click here for original recipe with reviews.


This was THE recipe I was craving!  Simple and delicious and exactly what I remember but without the ice, rock salt, and old cranky-type ice cream maker.  It seriously only took me a few minutes to pour the ingredients into the blender and then in to the mixer...then I was able to
'set it and forget it'.


Wednesday, June 27, 2012

Pinning with Purpose

If you're just joining us, er--me, I'm about to start The Pinterest Project.  I have committed to completing one project from Pinterest every day until I decide to stop.  The project may be a recipe, DIY project, craft, or cleaning or organizational tip. The only rule is that I complete the project and blog about it.  I hope to learn new things and in the process of posting my results I hope my writing/blogging ability improves.

Today's project is a simple one but one that needs to be done (I'm sure we'll have lots of these).  The pin 'How to Clean Your Dyson' was originally posted by Ask Anna and you can click on the link to view her post as well as detailed instructions and photos.  

In fear of sounding all uppity I won't go on and on about how superior the Dyson is to oh, say, every other vacuum on the market.  I love my Dyson.  In fact, if it wasn't illegal in 46 states I would indeed marry it.  So, with my love affair now made public I have decided it's time I start taking better care of it.  Her?  Him?  We'll say him.  Who doesn't love a guy that picks stuff up?  I've had him for a little over 5 years and I'm ashamed to say he's never had a proper bath.  So today's Pinterest Project is for you Mr. Dyson, I hope you enjoy it.

After printing the instructions and gathering the supplies I realized that I had a different Dyson model than Anna and went back to the computer for my model specific instructions.  If you find yourself in the same situation just Google 'How to Clean Dyson (and then enter your model #).'

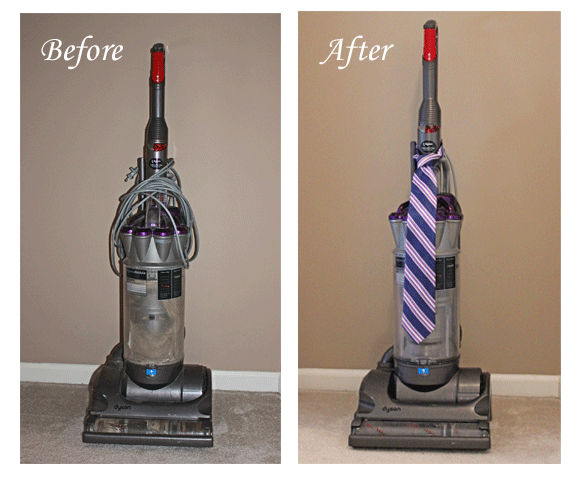
Dyson Before and After

I think he cleans up well.  No more dust, gunk, or fur.  And once the filter is dry, I'll put it back in and give the guy a whirl! The entire project took about 20 minutes and I think he looks at least 5 years younger.  

Seriously, people Dyson just 'gets it'.  In order to keep him 'working properly' his filter needs to be cleaned on a regular basis.  The company has created an easy email reminder so that you'll never neglect him again!  Click here to schedule your reminders!

Copyright © Team Ibrahim | Blog Design by Lilipop Designs